Showing posts with label diy. Show all posts

Tuesday, December 3, 2013

Tutorial: Using a Silhouette Cameo with a Sharpie pen to address cards

Last year for my birthday, B gave me a Silhouette Cameo. While I don't think I've mentioned it on the blog, this machine is amazing! I used it last June to make a "Classroom Jobs" board for Ryan's first grade teacher. We went with a board that looks like an iPhone, with each app being a pocket that holds the student's weekly job.
In order we have Line Leader, Door Holder, Calendar Reporter, Boys bathroom monitor, Teacher's assistant, line monitor, weatherman, girls bathroom monitor, substitute, caboose, classroom helper and the last "app" pocket holds the names of students who do not have jobs this week.
 I made every single app, cut every square, using the silhouette. This entire board, from idea in my head to laminated finished project, took less than two days to make, working when the kids were busy or after they went to bed.

I LOVE my Silhouette Cameo. And no, I'm not being paid to blog this. I seriously just love it.

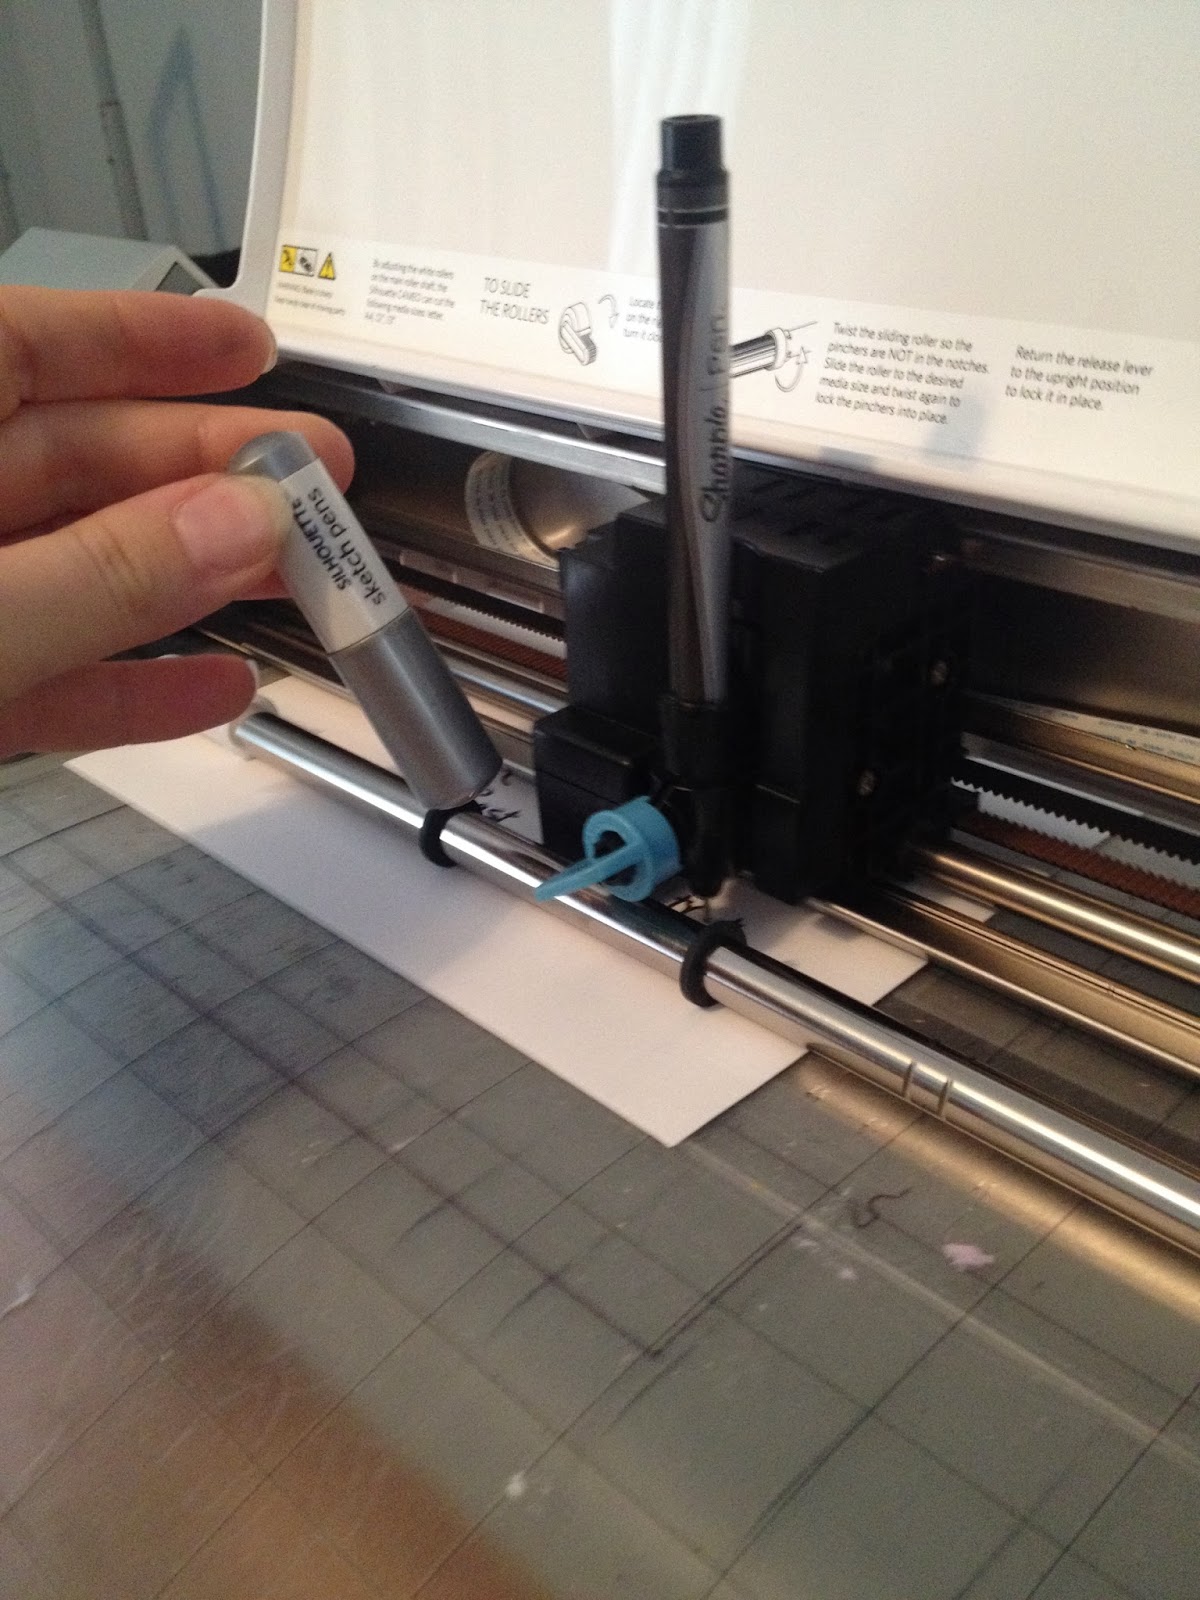
My Cameo also came with some sketch pens. But I think they're less than stellar. They don't always write smoothly and I'm not a huge fan of the metallic choices. But I did realize that pretty much any pen would work, if the machine would just hold it. (The sketch pens are chubby!). So after brainstorming, I realized a small strip of electrical tape would make a regular fine point Sharpie or Sharpie pen, chubby enough. After successfully addressing over 50 Christmas cards, I took a quick iPhone video tutorial.


The video: It's not fancy, I'm pretty sure you can hear my dogs and kids in the background but I think it could really help others who are looking for a personalized yet quick way to address envelopes. The result is more thought out than just feeding an envelope through the printer. You can tell it was done with a pen/marker but people aren't going to know how your handwriting looks so neat!


Saturday, November 12, 2011

Oh Pinterest, how I love thee!

So a few months ago, I discovered Pinterest. It's a virtual pin board...you see something you like on another blog or website you ''Pin It" {like bookmarking} and it shows up on your pin boards. I have a button on the right hand column that says ''Follow me on Pinterest''. If you click that, you can see what I mean.

But, I digress.

I freaking love pinterest. Yes, it can be a major time suck but used wisely, it's also so informative! I started out using it as a means of bookmarking things for Sissy' birthday party. I used a bunch of those ideas {circle garland, pennant birthday sign, rainbow themed} at her party so it was win-win. As I was pinning things for her party, I started seeing recipes and craft projects....gradually I pinned those too. Hence, our ''monster pillows'' inspired by the ''Pajama Monsters" I found pinned by a friend...
I used Pinterest to get ideas as to what to wear for our family photos; what colors coordinated and pose ideas for all of us. I don't think I used any of what I pinned {it's hard to remember and apply in the situation!} but it made me realize that as long as we were all happy, the camera would catch that...and that was most important.
Like I said, if you aren't on Pinterest, you should be. It's amazing. I try to pin things that i will actually use/do/try so while I've been on for months, I haven't really pinned that much considering. I've tried a few of the recipes (chicken bacon ranch mac & cheese, cheeseburger soup, frozen pureed banana), learned a few photo and organizational tips. It's amazing. Did I say that already??

So on to today. I'm sick...or getting sick. Woke up with a sore back, headache, sore throat and that general blah feeling. My ears feel like there is fluid in them and sufficed to say, I didn't want to even leave the house today. So this afternoon, I was checking my usual ''YAY it's nap-time!" things {email, facebook, blog list and pinterest} I was reminded of a project that I had pinned weeks ago. I didn't forget it because it wasn't that important, it was just that life got in the way and I didn't have time to get my sewing machine out. And it was something I needed to make. So it's naptime, it's quiet and I figured better now than never.

What did I make? Why a Bapron (baby apron) or two,
And Sissy using one of hers....

It's a tutorial that I pinned from Craftiness is not optional, and I love it! Sissy has been yanking bibs off for months now. She'll yank til the velcro comes undone, then throw it to the dog. So this is perfect. There are arm holes to slip it on, then you knot it in the back. It's nice and big, when she sits it comes down past her waistline, keeping her pants clean too!
Please excuse the horrible lighting, it's dark by dinnertime now...Flash=crappy pics
The best part is how quick they are to whip up! I made two in about an hour...and I had to make the brown bias tape. Everything I needed, I had on hand. This one was made from leftover nursery bedding fabric, the other is a cupcake fabric with leftover store bought, double fold white bias tape. Both are backed in flannel for absorbency. Though I would love to make one in oil cloth or laminated cotton...so easy to wipe down. They really are perfect and Sissy doesn't even realize it is a bib. She didn't fight me putting it on or try to take it off while eating. I think because I slip it on her arms, she thinks she's getting dressed and just leaves it alone. Total bonus! The barpon...who knew right!? Thanks Pinterest!

Tuesday, September 13, 2011

the craft bug has bitten...

So a few weeks ago I posted about my awesome freebie find. I'm pretty conflicted as to what I want to do with it so for now, it's sitting in the garage still. Untouched. Then with school starting, B's new job, and planning for Sissy's first birthday...the dresser was most definitely pushed aside. But last week, I *needed* to craft. It's like an addiction, I swear. So I decided to make my version of the balloon wreath that is floating all around Pinterest. {feel free to follow me, I linked a button over in my right sidebar}. I love it!
Of course I was interrupted no less than 1 bajillion times, but split over 2 days, it took about 2 hours total. So then I was like ''What else can I make???".....a Pinterest search later and I was directed to these little guys:

source
 They are "Pajama Eaters". Perfect little stuffed animal guys to feed your pajamas to in the morning, so your kids actually wear them more than once before tossing them on the floor. Well, I think they are adorable. But I couldn't help but think ''those would make AWESOME pillows". See my boys are sorta obsessed with Pillow Pets. And I may have told them that maybe we could get them each a mini-pillow pet for the plane ride. {this was only after they said they were taking their big ones on the plane}. But then I actually looked at mini-pillow pets and they're little, littler than I thought. And they're $13....do the math, times it by four and suddenly I'm shelling out $52+ tax on four pillows.

Get out of town, that is not happening. Not for something that is seriously, 6x8 inches.

So when I saw Jodi's tutorial for her Pajama Eaters, I immediately bought it. I looked over the tutorial {seriously one of the best tutorials ever! so easy to follow and cute} a few times, decided that instead of stuffing the little guys (sized 13x13 inches) with fiberfil, I could make them a bit bigger and instead use a travel pillow. So with that in mind, I showed the kids. THEY LOVED THEM!! So I explained that mommy would make them a ''pillow pet'' Monster instead of buying the baby ones. Done, they loved it. I set out for the fabric store.

Once there (with all four kiddos in tow) I had them each pick out a solid color for their monster. Then we loaded up on the necessities like fabric for the mouths, zippers, heat & bond and thread (I have a ton but it was on sale and I wasn't sure what colors I had, yada yada). They did SO incredibly well. Especially when you take into consideration that I jaunted to the fabric store at oh, 11:15am which is when we usually eat lunch. And then the cutting table line..oh my word. I think we were in line for over 30 minutes. Took forever. So we finally get our stuff, pile up in the van and I reward them with lunch at McDonald's. YAY!

So, besides the fact that I'm the coolest mom ever, my real reason for McD's was it's location; inside of Wal-Mart. We ate then went and grabbed 4 travel pillows from the bedding department. I felt like I hit the jackpot...each pillow was $3.00. Oh yeah, saving money, woot woot!

So we get home, figure out what size my monster pillows will be (14x20 was the pillow size, I cut everything to 15x21 and it fit like a glove) and set to work. A bit easier said than done since I had all the kids home while B was putting in overtime. But we popped in a video, got Sissy down for a nap and Mommy went to work. It wasn't a difficult project at all, but time consuming measuring and cutting all the pieces.  Sissy's was finished first, followed up by the boys the next day. The end result? Some pretty freaking happy kids:
yes, sissy's monster pillow is bigger than her. and yes, bubba just shoved an entire stuffed animal in there.
So while I let the kids pick the color, I then also gave them free reign on how many eyeballs their monster would have. Well, except Sissy, I just gave her's two. Bubba saw Sissy's and said ''I want LOTS of eyeballs...like TEN!" and I said...."um, 10 is a lot of work, if you want this before bedtime we need less than ten." "Okay, three silly eyeballs." Okay, three. Pooks said he just wanted two super tiny eyeballs. Well I made them super tiny, showed him and he said ''bigger than that mom'' so he got normal sized eyeballs I guess, but still two of them.  Peanut wanted "ONE GIANT EYE". Easy enough, I swear it's something about being the third child that just makes things easy! Each kiddo also got to pick some scrap fabric I had lying around as a accent. 

 In order: we have Pook's yellow monster {complete with Barry nametag), Sissy's hot pink monster (complete with bow), Peanut's green monster (complete with m&m horns) and Bubba's blue monster (with a silly nose and monsters all on his legs).
Want to know how you can tell that your kids genuinely like something? They request to have their pictures taken. A lot of pictures. Here they are ''going night-night''. Right before the picture took, Sweetcheeks was actually laying on her pillow too. By the time I focused the shot, not so much. 

So obviously this project was a huge success. First off, I conquered my irrational fear of sewing with zippers. Secondly, even after buying Jodi's tutorial, then the fabric, then the pillows I still spent less than the $52 I would have spent on pillow pets. Woohoo!

And the best part? The kids like them BETTER than their pillow pets! All kids slept with/on their monsters. Do they use the pockets for pajamas? Eh. Bubba does but Peanuts typically has paper in it, or hot wheel cars, or crasins. I plan on putting a pair of sweats and a tshirt in each one for the plane ride...never know when you'll need an extra outfit (or four).

So yesterday I finished those and today, I started a Halloween Rag Wreath. Watch out, stand back, I'm on a roll....

Monday, June 27, 2011

I am jonesing for a new craft project.

For reals.

I haven't crafted something in a long time. I made a wreath at Christmas and I made our stockings but then...well then I didn't make much. I did make some potholders (out of a super cute M&M fabric) for my aunt but I never took photos. I painted a bow holder for all of Sissys bows but that took like, one evening and I have yet to even take photos of it (or even hang it up. It may be sitting on her dresser holding all her bows. Maybe). One night I made up some of my Stroller Buddy handles and even created an Etsy shop with a few listed {I made up a bunch but listed a few...Etsy charges for listings and I wanted to see if they'd sell first}. But I really really want to refinish something. I read all these cool blogs where people buy a dresser or a nightstand for $10 and it is the UGLIEST thing ever but then they sand it, paint it, switch out the handles and viola, totally gorgeous new piece of furniture for less than like, $30.

Case in point, look at what Kara did over on Craftastical...
She took this freebie (totally yuck, right?)
 and turned it into this by sanding, painting and switching out the pulls. Seriously!
I want to do it! Except I don't need a nightstand. What I want to do is find some big beefy buffet or long dresser, strip it, sand it, paint it/stain it and make it into a new TV stand. Something that I can hide puzzles, dvds and books in but it'll look gorgeous without spending $500 (or more) on a solid wood "entertainment center". I am searching Craigslist and cannot wait to find a piece that "speaks" to me! Right now I have my eye on another little project but I'm waiting (impatiently) to hear back from the seller as to see if it's still available!

Thursday, December 23, 2010

the stockings were hung by the fire with care...

Well we don't have a fire, but you get the jist.

Yesterday I kinda sorta realized that I had never made Sissy's stocking. We've had five stockings hanging up for almost two weeks but it didn't really dawn on me that we were missing one. So yesterday using the tutorial found here, I whipped one up. I cheated it and instead of using lining and batting, I used fleece. Hey, it's the inside of a kids stocking, I highly doubt that she cares. I also didn't use their pattern, I traced our existing homemade stockings. And, it's a good thing I did because apparently we had a mouse get into our Christmas stuff as some point during the last year and the furry little rodent ate through three stockings! Ugh, I am not a mice lover and it grossed me out knowing that he was in our stockings...where trinkets and snacks and such go. Yuck.

So like any sane person (right?) I waited until December 23rd to make 5 {more} stockings. (Yes, I technically only needed three but then the stockings wouldn't match so...yeah, five stockings). I knocked 4 of them out during naptime and then finished the last one after the kiddos were in bed. The two pink ones are quilted, they are mine and Sissy's. On the boys' I skipped the quilting because I'm lazy and was sick of sewing straight lines. I thought they turned out really cute considering all of the above.


In order we have B's, Bubba's, Sissy's, Peanuts, Pooks and mine. Hopefully I can get them embroidered at some point.
(please excuse the crappy lighting, it was like 9pm and no natural light was to be found)

Tuesday, December 7, 2010

DIY: Looped Ribbon Holiday Wreath

While we're still living amongst a few boxes in our bedroom, for the most part the house is put together so I decided to use naptime today to good use making a Holiday craft.


Tatertots and Jello shared their version of a Looped Ribbon wreath back in October. I was slightly busy having a baby in October and never had the chance to make a wreath but I bookmarked the tutorial because I seriously *love* how these look! My only problem today was that I had the craft itch but have yet to find/unpack my sewing machine. Their tutorial uses a sewing machine, my adapted DIY below uses a hot glue gun instead. Total project time was just under four hours but that's including prep, clean up, sipping Starbucks and listening to Christmas music while gluing and oh yeah, two hours of that was multi-tasked with watching the kids. Easily a project that can be completed in one evening and I'm thinking they would make really great gifts for teachers, neighbors, etc!

For a 14in wreath, you will need:

  • 1 craft wreath (floral foam, straw, Styrofoam...whatever you can find, is fine)
  • Glue gun and glue sticks (i went through at least 10 sticks using a mini-melt, high temp gun)
  • Scissors and a piece of cardboard/cardstock
  •  9 yds of a base ribbon
  • a few pins
  • 10-12 assorted ribbons, 3ish yds each *i highly recommend using ribbon that is 1/2" width or larger...it will be very time consuming and you'll go through a lot more ribbon if you use smaller than that*
  • optional: a lighter
Step 1: Wrap and adhere your base ribbon to your wreath form. I used a small dab of glue, used a pin to hold it in place and wrapped the ribbon all around the form.
-Finished Result after step 1-
Step 2: Cut all of the ribbon that will be your loops to approximately 4.5inches. 
Quickest way to cut this much ribbon: take a piece of cardboard and cut to 4.5inches, then wrap your ribbon around the cardboard. Then take your scissors and cut the ends. Viola, perfectly measured and cut ribbon without a lot of hassle. Do this for all your ribbon. (note: I did not cut the entire spool of each ribbon; only about 2/3 of it; the rest I left just in case I didn't need it for this project, it wouldn't be cut into strips. I plan on making hairbows for Sweetcheeks using it later on!)
Step 3: Take a piece of ribbon, fold in half, place a small dot of hot glue about 1/4in from the end and press sides together.
Step 4: Now take your ribbon loop, open up the tales a bit, apply another gob of hot glue and press this flat onto your wreath form. Keep doing this, in sections, using all your ribbons evenly.
At first it looks kinda funny and you're sure that you're doing it wrong and that you screwed it up. You didn't. Just keep going using even amounts of each ribbon. I found it easiest to glue a bunch of loops, then place and glue them to the form all at once.
Keep going and going until the front of your wreath is completely covered. (There is no need to cover the back, which is why you used your base ribbon). For this wreath, I covered all but a 2 inch section at the bottom center; I had this tiny little stocking (from a gift card) that I wanted on my wreath so I hot glued it there, affixing ribbon around it.
Tada! Doesn't that look festive?
and a close up.
These are pretty inexpensive too! The wreath form cost $2.15 at Hobby Lobby but according to Tatertots & Jello, you can buy these for $1 at the dollar store. {I wasn't going 2 different places with 4 kids so save a buck). All the ribbon was 50% at Hobby Lobby making it $1 a roll for most. (I also used 3 spools of ribbon that I already owned as well). Total spent was around $17 but I have plenty of leftover ribbon. And the possibilities are endless! You could make one to celebrate a Holiday, you could use the colors of your favorite football team or just colors that you like or that match your house. So simple, so festive and even the hubs liked it...totally worth the tiny burns accumulated from the glue gun!

Saturday, September 25, 2010

Coolest, Easiest, and Funnest Project Ever

I stumbled across a tutorial while blog hopping a long time ago using Freezer Paper to make "Screen Printed'' T-Shirt designs.

I know...say what?

I can't even remember where I originally read about it but I know it was last year around this time because I was working on I-Spy bags when it happened. I mentally filed it away for later use but then never had a need to use it.

Until now :)


I knew I wanted to make/get each of the Little Dudes a ''Big Brother'' shirt to wear up to the hospital when they meet their little sister for the first time. I even proposed the idea to them and they loved it! Problem is I have 3 Little Dudes all whom wear a size 4T or smaller and it's not easy finding 3 shirts in the right sizes and styles. Not to mention they each cost around $12 (or higher) so we're looking at dropping almost $40 on 3 tshirts.

Um, I think not.

So I did what I do best and thought ''Oh it wouldn't be hard to make those". The problem was I knew that those Iron-On shirt transfers don't hold up very well to washings. I knew that I didn't have a steady enough hand to hand-paint each shirt with Puff paint and seriously, it's 2010 not 1993...I think we've moved past puff paint. Then I remembered the Freezer Paper shirt idea. So I headed over to one of my favorite blogs: Made and searched through her tutorials. Ah-ha, Freezer Paper Stenciling tutorial.

I won't get into all the details but basically freezer paper works wonderfully as a stencil for creating a screen-printed effect on tshirts. You simply trace/draw your design on the dull size of the freezer paper; cut it out with an exacto knife. Iron the freezer paper 'stencil' (shiny side down) to the shirt. Apply fabric paint, let it dry and then remove the paper...it just peels right off! Then you have a super cute shirt that is 100% original, cute, holds up well in the wash and, most appealing to a mom of soon to be four kids....CHEAP. And did I mention cute? {please excuse the crappy cell phone pic; it's 1am folks and this is the best you're gonna get for now}
Seriously how adorable did those turn out? I used a fun playful font and added a number to the boys just for cuteness. Best of all, the breakdown:

3 Long Sleeve Shirts (size 5t, 4t, and 2t if you're curious) @  $3.50/each = $10.50
4 pack of fabric paint (in the colors the boys had chosen) = $4.00
Newborn white onesie: Free (we already had that)
Grand Total Spent for 3 Customized Shirts = $14.50
Each kiddo having a special shirt to wear on a very special day: Priceless

Overall it took about 3.5 hours to do all 4 shirts. Most of that time was spent cutting out all the letters with an Exacto knife; not exactly a quick task. It may have gone fast if I hadn't been eating Oreos and watching 'How I Met Your Mother'' at the same time. The best part is now that I know how easy it is, I plan on making them cute personalized shirts for their Birthday's and instead of buying Holiday tee's at Old Navy I can just whip up something at home. Woohoo!

Wednesday, September 15, 2010

Tutorial: How to make a Diaper Cake

Okay so for about 2 years I made and sold diaper cakes. While they are fun to make and not very expensive, I decided to 'close up shop' so to speak. Mostly because I no longer have the room in this house to keep everything out and the overhead (when not having consistent orders) was really limiting the income that I was making. Most cakes I just broke even on because I'm too nice of  a person I didn't like charging too much for something that is so simple to make. So, better late than never, I'm sharing a "How to" here and on the diaper cake blog.

Step 1: Gather your materials. Basic items you will need are:

-diapers (I highly recommend Pampers Swaddler size 1 or 2...they are all white, they are soft and even if the newborn is 8+lbs at birth, they'll still fit!)
-rubber bands
-cardboard or cake board, tissue paper
-ribbon (fabric ribbon, not gift wrap ribbon)
-scissors, hot glue gun, tape/double stick tape
-any accessories that you want in the cake (in this instance a hooded towel, washcloths, a travel soap/lotion set, a small pkg of wipes)
Alright, let's get started. First things first, we need to cover the cake board/cardboard. Pretty self-explanatory, place the board on the paper. Fold or cut it around the board, taping the excess to the bottom. It'll start out like this:
Finished like this:
So, take your diaper and face it towards you with the size/design facing up.
Starting at the top, roll it toward you. Tight enough that it makes a roll but not so tight that it's super skinny.
Once it's all rolled up, wrap it with a rubber band. Again tight enough that the diaper doesn't unravel but not so tight that it leaves a huge indention.
Now repeat that step...a lot. For a 2 tier cake you'll need about 25 diapers, for a 3 tier you'll need about 50. Once you roll a bunch, it's time to assemble the tiers. You'll need 8 diapers to make the center/core of each tier and also for the top tier. Start with one diaper, surround it by 6-7 to form a circle.
Once you have your circle, wrap it with a rubber band. Again, not to tightly..use a bigger band if needed. It needs to look like this:
Now if you're making a 2 tier cake, add another circle of diaper around the outside of your core. If you're making a 3 tier cake (like I am) then you'll need to add 2 more circles of diapers around the core. Bascially if you're making a 3 tier, you need a center diaper with 3 rows around. If making a 2 tier, you need a center diaper then 2 rows around it, etc.

Here is my bottom tier, for a 3 tier cake. I labeled it to show what I mean. There is one diaper in the middle labeled "center". Then 3 circles of diapers surround it.
Repeat this step until you have all your tiers assembled. Next stack them together. If you are going to be using something big in your cake, you can omit diapers to fit it in to your desired tier. If it's a stuffed animal, it can go on top. In this instance I was using a hooded towel...definitely too big to go on top, so I subbed it in to the second tier. You can see where I removed some diapers from the second tier to make it fit, inside of my outer rubberband.
Now stack your top tier.
 Now if you have any washcloths, burp rags, onesies, etc that you are wanting to include, roll those up to approximate diaper size and substitute them in. 
Now it's time to decorate or add little things. I always include a travel set of soaps/lotions with each cake. Sometimes I attach them to the outer ribbon, sometimes inside of the ribbon...just depends on what looks best. On this cake, I opted to place them inside of the ribbon, against the diapers. It's helpful if you have a little double stick tape, to make sure they stay up and against the diapers but it's not required.
Now we have the cake constructed. Let's add the ribbon and pretty it up. I must say that for me, it's an absolute necessity to use fabric ribbon and not that plasticy gift-wrap ribbon. It's so much prettier, the mom-to-be can reuse it if she wants (bow holder anyone?) and it's usually cheaper. Hobby Lobby *always* has this on ''sale'' for 50% off, usually less than $2 a roll. I typically choose 2 ribbons, one wider than the other and stack them.
The trick to using ''real'' ribbon is you must heat-seal the ends so it doesn't unravel. It's really easy to do...once you've measure how much ribbon you need (add an inch for overlap), take a lighter and (without actually touching the flame!) get the ribbon close enough to the flame that the ends melt together. Please use common sense when using fire..don't do this while it's on the diaper cake, etc. Once it's heat-sealed, wrap it around your cake and hot glue the top ribbon to the bottom ribbon. Never put hot glue on the diapers, just the ribbon.
If using an accent ribbon, attach it in the same manner, on top of the wider ribbon. Repeat for all tiers. So now you have all 3 tiers prettied up, but we need to ''stick'' them together.
My method? Bamboo skewers. They're inexpensive, they aren't intrusive, they don't reduce the amount of diapers that you use, and it's simple. So, stack your cake up again...bottom 2 tiers only. Then slowly push 2 bamboo skewers down through the layers, between diapers, until you reach the cardboard.
It'll look kinda funny with the skewers sticking up; go ahead and break/cut those off so they are even with the top tier.Take a 3rd skewer and insert it in into the center of the cake but DON'T cut/break it. Use this as a stabilizer to attach the 3rd tier. Carefully slide the 3rd layer over the skewer (careful not to rip any diapers). Now your diaper cake won't be so wobbly!
(I circled where the hidden skewers are..)
 Tada! Your cake is now finished :)
 Now if you want to wrap it up in tulle, you can do that now. You'll need about a 1.25yd of tulle (again, it's like $1/yd at Hobby Lobby) and you just place the cake in the center of the tulle yardage. Pull the tulle up and rubberband it just about the top tier. Cut the excess off, attach a ribbon to cover the rubberband and you're ready for gift giving. (I made this cake just before taking it to the shower, so I did not wrap this cake in tulle.)